Auto-response callback
Latest update: November 5th, 2020
Viafirma offers several automatic response and redirection methods described below.
- callbackURL
- callbackMails
- callbackPhones
- callbackRedirectURL
CALLBACK URL
When creating a new message, you can use the callbackUrl attribute, allowing the request to make a POST call to the URL informed in the attribute when it reaches any of the possible states in which the automatic response is launched.
The POST is performed with a parameter in the request called message, which contains in string format the JSON representing the object returned by the GET /v3/messages/{messageCode} service.
The possible states on which the callback is launched are:
- RESPONSED: signing process completed.
- REJECTED: signing process rejected (by the end user or by the administrator).
- WAITING_CHECK: signing process completed by the end user and pending approval by any system user.
- ERROR: signing process not completed due to an error listed with the status
- EXPIRED: expired signing process.
Using Callback URL
Through API you will be able to inform the response URL in the message.callbackURL attribute of your signing process, and if the URL we will POST is secured, you will be able to define the credentials using the message.callbackAuthorization attribute, which we will include in the header of our request, setting the BASIC security with the following format:
Basic Y3ZpbGxhcjoxMjM0NQ==
Callback URL example
{
  "groupCode" : "myGroupCode",
  "workflow" : {
    "type" : "PRESENTIAL"
  },
  "notification" : {
    "text" : "Sample Landing Page for signing new contracts",
    "detail" : "New Service 001-A"
  },
  "metadataList" : [
    {
      "key" : "myMetadata_01",
      "value" : "myValue_01"
    }
  ],
  "document" : {
    "templateCode" : "myTemplateCode",
    "formRequired" : true,
    "formDisabled" : true
  },
  "callbackURL" : "https://mysystem.com/responseSigned/",
  "callbackAuthorization" : "Basic Y3ZpbGxhcjoxMjM0NQ=="
}
How to process a response
Since it is a POST to an HTTP address, the information contained in the request can be processed in different ways. For example, if the reported URL corresponds to a REST service, the service can process the "message" string from the request.
Another example could be that the reported URL corresponds to an URL managed by a java filter or servlet, being able to implement a java class that processes the message parameter from the request. Here is an example of a java servlet:
Example:
private void doService(HttpServletRequest req, HttpServletResponse resp) {
    if(req.getParameter("message")!=null){
        try {
            String json = req.getParameter("message");
            //check message status or download document
        } catch (Exception e) {
            log.log(Level.SEVERE,"Error parsing message JSON.",e);
        }
    }else{
        log.log(Level.WARNING,"Empty request received.");
    }
}
CALLBACK MAIL
When creating a new message, you can use the callbackMails attribute, which will allow you to include one or more email addresses comma-separated which we will notify when the life cycle of the request reaches any possible status when the automatic notification is launched.
The possible states on which the callback is launched are:
- RESPONSED: signing process completed.
- REJECTED: signing process rejected (by the end user or by the administrator).
- WAITING_CHECK: signing process completed by the end user and pending approval by any system user.
- ERROR: signing process not completed due to an error listed with the status
- EXPIRED: expired signing process.
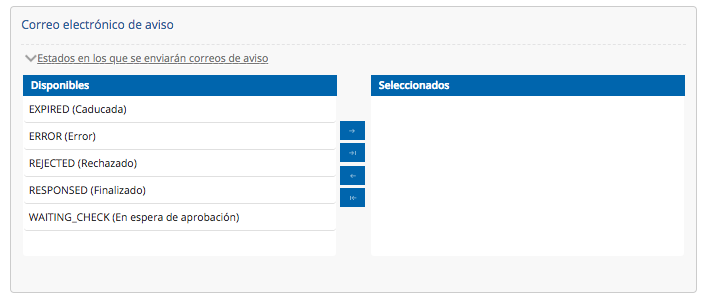
Unlike the callbackUrl, the statuses related to the notifications are configurable. That is, by default we can notify via email in each of the planned statuses, but the administrator of a workgroup can decide which statuses are likely to trigger email notifications.
For this, the group administrator will only have to access the group-specific settings and select the desired statuses.
Other options for the CALLBACK MAIL
Using the callbackMails also allows the use of an optional attribute with the following feature
callbackMailFilename: By default we will attach the signed document in the email, but the name of the document (pdf) is chosen by us, and we always use the request code. If you want to standardize the name of the attachment you can use this attribute to set the name you want.
{
  "callbackMailFilename" : "mycompany_contract.pdf"
}
callbackMailsBcc: List of emails separated by , which will receive the signed document as a hidden copy.
{
  "callbackMailsBcc" : "[email protected]"
}
callbackMailsCc: List of emails separated by , who will receive the signed document as a copy.
{
  "callbackMailsBcc" : "[email protected]"
}
By default, emails reported in the callbackMails attribute are sending by blind copied. If you want it to appear in the "To", you need to set the MAIL_BCC property to false in the group configuration.
CALLBACK MAIL appearance and content configuration
You will be able to personalize the look of your emails as well as their content by using two configuration elements:
- Style settings:
email-template.html
The administrator of a work group will be able to upload an email template allowing him/her to define a personalized style for all the communications sent by email from Viafirma. Not only notifications associated to callbackMails, but any type of notification, for example those sent to users warning them about a new document to be signed
To edit this template the group administrator can access to manage styles:

- Content configuration:
The email contents can be customized, and you can make use of dynamic content, using variables that are included in your signing processes, such as form fields, thus providing the appropriate customization when communicating with users.
For all possible statuses related to notifications you can configure Subject and Body, via visual configuration of your template and configuration via API.
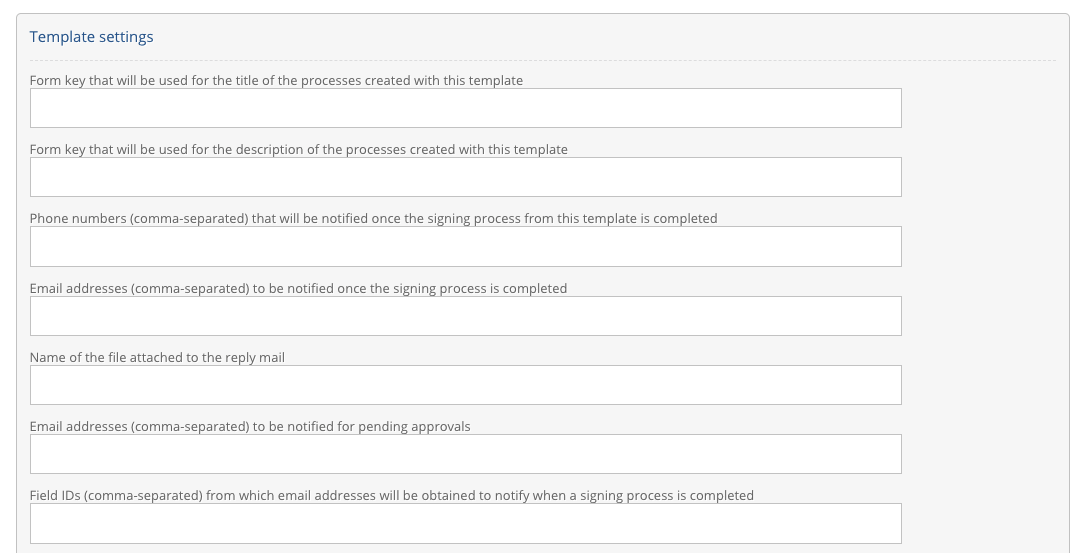
Setting up notifications in your template

The owner of the template may access their configuration and choose the Notifications option, where they can define the desired content for each of the possible statuses.
Notifications configuration via API
You can also define the content of the notifications explicitly in each request via API, using the message.customization object:
"customization": {
      "mailFrom": "string",
      "smsFrom": "string",
      "requestMailSubject": "string",
      "requestMailBody": "string",
      "requestSmsBody": "string",
      "callbackMailSuccessSubject": "string",
      "callbackMailSuccessBody": "string",
      "callbackMailExpiredSubject": "string",
      "callbackMailExpiredBody": "string",
      "callbackMailWaitingCheckSubject": "string",
      "callbackMailWaitingCheckBody": "string",
      "callbackMailRejectedSubject": "string",
      "callbackMailRejectedBody": "string",
      "callbackMailErrorSubject": "string",
      "callbackMailErrorBody": "string",
      "callbackSmsReminderBody": "string",
      "callbackMailReminderBody": "string",
      "callbackMailReminderSubject": "string",
      "successMessage": "string"
    }
Example:
{
"groupCode" : "myGroupCode",
"workflow" : {
"type" : "PRESENTIAL"
},
"notification" : {
"text" : "Sample Landing Page for signing new contracts",
"detail" : "New Service 001-A"
},
"customization": {
"mailFrom": "string",
"requestMailSubject": "My Company: new contract for signing",
"requestMailBody": "Dear Customer y <span style=\"font-size: 10pt;\">Follow the link for signing your...: </span>",
},
"metadataList" : [
{
"key" : "myMetadata_01",
"value" : "myValue_01"
}
],
"document" : {
"templateCode" : "myTemplateCode",
"formRequired" : true,
"formDisabled" : true
},
"callbackMails" : "[email protected]"
}
CALLBACK MAIL Settings and Automations
At template level you will be able to adjust the notification settings, for this the template owner will be able to access the template settings and choose the Settings option.
This section allows you to define different options that will help you to automate notifications as explained below:
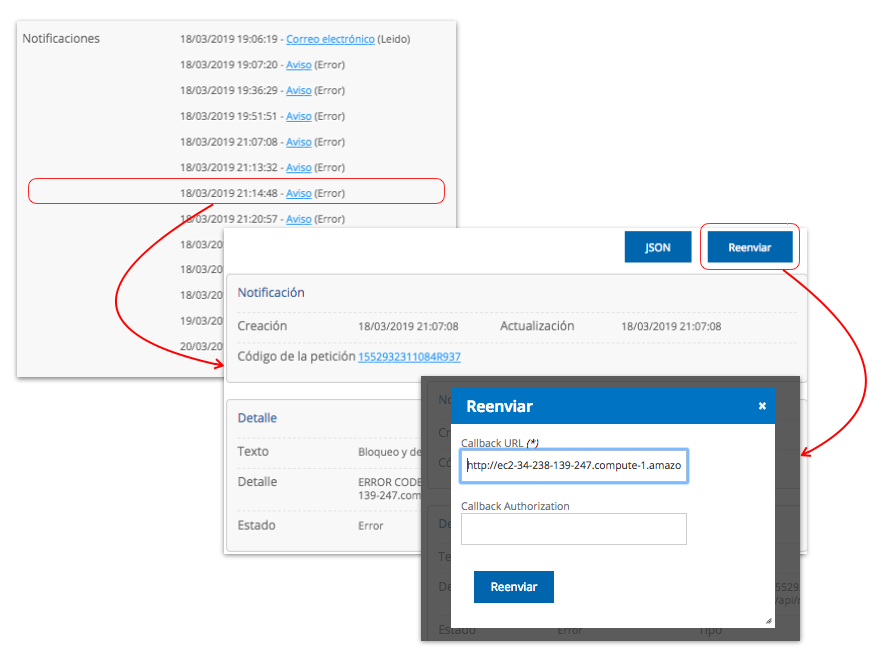
Manual CALLBACK resending
You can resend the callback linked to your request, whether it is a callbackURL or a callbackMails. There are two ways you can do this:
From the request details
If you access to Viafirma Documents back end and look for your request, you will find the details on the notifications, and you will be able to access to the individual details of each one of them. By doing this, you will find the option to resend, enabling you to modify some data before the resubmission..
Via API
You have a PUT method available that will allow you to retry the callbackURL of your request..
PUT /v3/messages/resend/callback
CallbackUrl {
messageCode (string),
url (string, optional),
authorization (string, optional)
}
CallbackPhones (via SMS)
As we do for callbackMails we can also do it via SMS by using the callbackPhones attribute, in which you must enter the cell phone number(s) to be notified when the process is finished. Remember to use the country prefix, for example, +34. To notify several phones you must use a comma to separate them.
"callbackPhones" : "+34666000666"
The text sent in this type of callback can be defined and configured in your templates or directly in the API call, the same way EMAIL callbacks are configured.
Callback Redirect
You also can redirect your user to a web page that you report to us via API. For this you only have to use the following attribute:
"callbackRedirectURL" : "https://www.google.com"
In this way, when a web signing process finishes we will redirect the user to that page, and its URL allows to incorporate queries params that will help to apply some kind of business logic once your user arrives to the page.
results matching ""
No results matching ""